
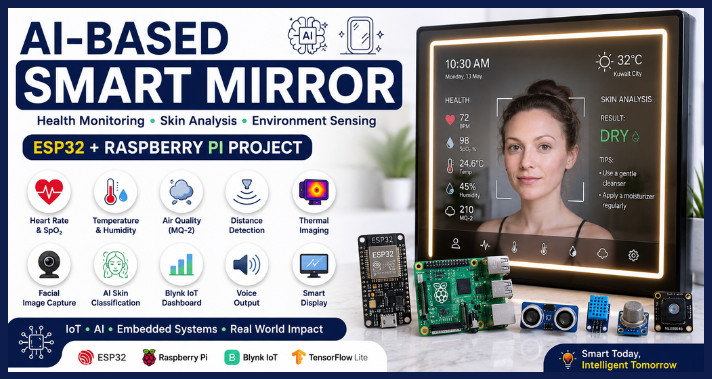
Smart mirrors are becoming an interesting part of modern homes, healthcare research and Internet of Things projects. Unlike a simple mirror, the Smart Mirror can present information, read sensor information, analyze images and interact with the user. This project develops an interactive AI-based smart mirror for wellness and sustainable living. It includes an ESP32, Raspberry PI, environmental sensors, a pulse sensor, a thermal camera, a normal USB camera and a piece of artificial intelligence. The system is able to provide basic health and environmental measurement data, identify user, analyze face picture, and afford general skin care information.
Important medical notice: This is an educational prototype. It is not a certified medical device and must not be used to diagnose, treat or prevent any medical condition.
Main Objectives of the Project
The main objective is to build a system that is useful, easy to understand and suitable for daily interaction. The smart mirror is expected to:
- Monitor basic pulse-related signals.
- Estimate blood oxygen level for demonstration purposes.
- Measure indoor temperature and humidity.
- Observe smoke readings.
- Detect when a person stands near the mirror.
- Capture a normal and thermal image.
- Classify the visible skin image as acne, dry or normal.
- Provide simple and non-diagnostic skincare guidance.
- Display environmental and wellness information in real time.
System Architecture
The smart mirror is divided into two connected subsystems:
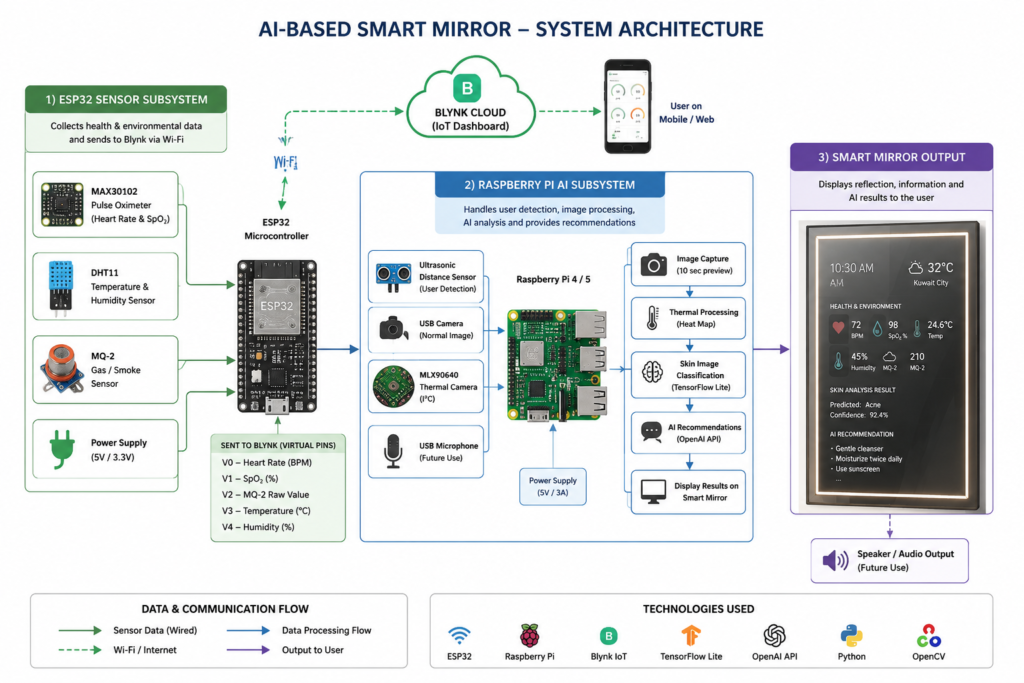
ESP32 Sensor Subsystem
The ESP32 handles continuous sensor readings and Blynk communication. It is connected to:
- MAX30102 optical pulse sensor
- DHT11 temperature and humidity sensor
- MQ-2 gas sensor
- Wi-Fi network
- Blynk IoT dashboard
Raspberry Pi AI Subsystem
The Raspberry Pi handles:
- User-distance detection
- Normal camera capture
- Thermal image processing
- TensorFlow Lite inference
- Skin-image classification
- AI-generated general guidance
Components Required
| Component | Purpose |
|---|---|
| ESP32 Board | Reads sensors and communicates with Blynk |
| Raspberry Pi 5 | Runs image processing and the AI model |
| MAX30102 sensor | Captures red and infrared pulse signals |
| DHT11 sensor | Measures temperature and humidity |
| MQ-2 sensor | Detects smoke and certain gases |
| MLX90640 thermal camera | Produces a 32 × 24 temperature frame |
| Ultrasonic distance sensor | Detects a person near the mirror |
| USB camera | Captures facial images |
| USB microphone | For voice interaction |
| Speaker | For audio feedback |
| Display screen | Shows the mirror interface |
| Two-way mirror or acrylic mirror | Allows the display to visible behind the mirror |
| Breadboard and jumper wires | Used for prototype connections |
| Power supplies | Power the ESP32, Raspberry Pi and display |
| Blynk platform | Displays sensor readings remotely |
| TensorFlow Lite model | Classifies captured skin images |
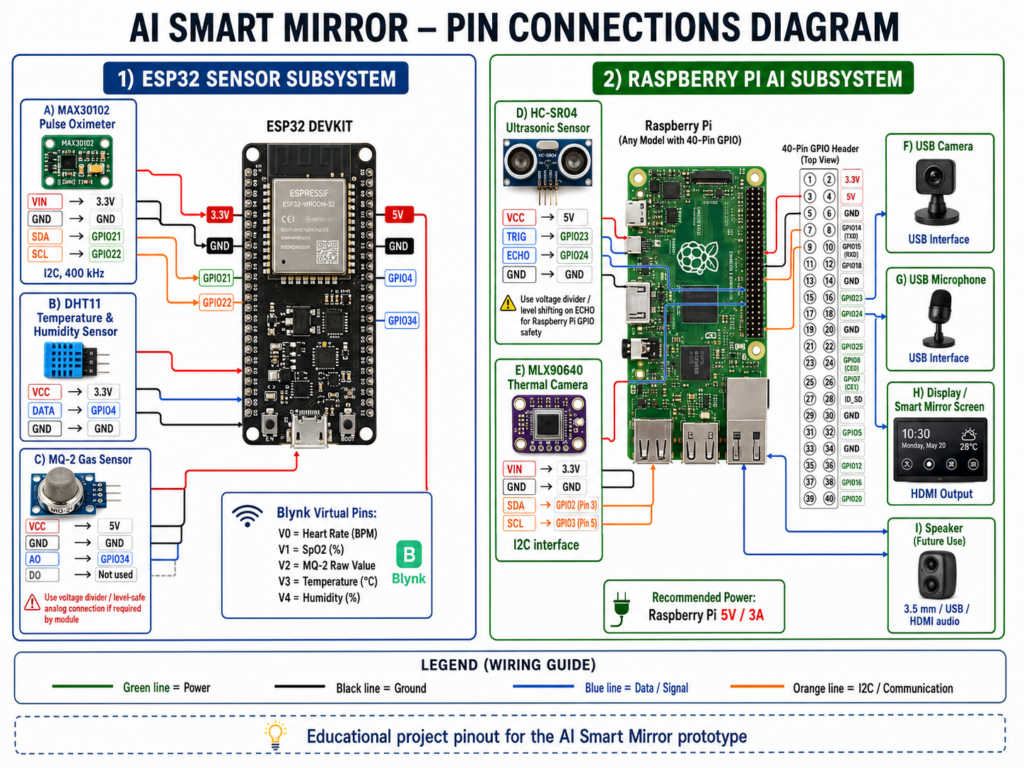
Hardware Setup Connections
Working Instructions
The complete instructions are given below:
How the ESP32 Code Works
The ESP32 program performs four main functions:
1. Finger Detection
The MAX30102 produces infrared and red-light readings. The program compares the infrared value with a threshold of 20,000. When the value is above this level, the code assumes that a finger has been placed on the sensor. When the finger is removed, the BPM and SpO₂ variables are reset to zero.
2. Heart-Rate Calculation
The code separates the changing pulse signal from its slowly changing DC level. It then looks for a valid signal peak. The time between two accepted peaks is known as the RR interval. Heart rate is estimated using:
The code only accepts intervals corresponding to approximately 60–160 BPM.
3. SpO₂ Estimation
The program stores short windows of red and infrared AC and DC values. It calculates a ratio and applies a simplified equation:
The result is restricted to the range of 85–100 percent.
4. Environmental Monitoring
The MQ-2 value is read through the ESP32 analog input. The DHT11 is read every two seconds. Valid temperature and humidity results are stored, while failed DHT11 readings generate an error message.
How the Raspberry Pi Code Works
The Raspberry Pi program performs four main functions:
1. User Detection
The program continuously reads the ultrasonic sensor. When the measured distance becomes less than 30 centimeters, it starts the camera process. A five-second cooldown prevents the system from activating continuously after one analysis.
2. Ten-Second Camera Preview
The normal camera and thermal camera run together for ten seconds. The normal camera frame is resized to 640 × 480 pixels.
The MLX90640 provides a 32 × 24 thermal frame. The program:
• Finds the minimum and maximum temperatures.
• Normalizes the thermal values to an image range.
• Reshapes the data into a 24 × 32 frame.
• Applies an OpenCV heat-map colour scheme.
• Enlarges the thermal image to 640 × 480.
• Displays the highest detected temperature.
• Places the normal and thermal images side by side.
3. Skin-Image Classification
After the countdown finishes, the system captures a final normal image. It resizes the image to the TensorFlow Lite model input dimensions, converts it from BGR to RGB, changes the data type to floating point and passes it to the model.
The model contains three classes:
- Acne
- Dry
- Normal
4. AI-Generated Skincare Guidance
After local classification, the program sends the image, predicted class and confidence scores to an external AI service. Its prompt requests:
- A short observation
- Three simple skincare tips
- A morning and evening routine
- Guidance on when to consult a dermatologist
Complete Code
The complete code for ESP32 and Raspberry Pi:
ESP32
#define BLYNK_TEMPLATE_ID   "YOUR_BLYNK_TEMPLATE_ID"
#define BLYNK_TEMPLATE_NAME "YOUR_TEMPLATE_NAME"
#define BLYNK_AUTH_TOKEN    "YOUR_BLYNK_AUTH_TOKEN"

#include <Wire.h>
#include "MAX30105.h"
#include "DHT.h"
#include <WiFi.h>
#include <BlynkSimpleEsp32.h>

MAX30105 particleSensor;

const char* ssid = "YOUR_WIFI_NAME";
const char* pass = "YOUR_WIFI_PASSWORD";

// ===================== SETTINGS =====================
const uint32_t IR_FINGER_THRESH = 20000;

#define MQ2_PIN  34
#define DHT_PIN  4
#define DHT_TYPE DHT11
DHT dht(DHT_PIN, DHT_TYPE);

// V0 — BPM | V1 — SpO2 | V2 — MQ2 | V3 — Temp | V4 — Humidity

// ===================== BPM GLOBALS =====================
#define AC_ALPHA    0.95f
#define MIN_RR_MS   375       // 160 BPM max
#define MAX_RR_MS   1000      // 60  BPM min
#define PEAK_THRESH 200       // lower = catches peaks faster

float    acValue   = 0;
float    dcValue   = 0;
float    redDC_val = 0;
float    prevAC    = 0;
bool     peakArmed = false;
unsigned long lastPeakMs = 0;

// ===================== SPO2 GLOBALS =====================
#define SPO2_WIN 25
float irAC_buf[SPO2_WIN], redAC_buf[SPO2_WIN];
float irDC_buf[SPO2_WIN], redDC_buf[SPO2_WIN];
int   spo2Idx = 0;

// ===================== OUTPUT =====================
int      stableBPM  = 0;
int      stableSpO2 = 0;
uint32_t lastIR     = 0;
bool     fingerOn   = false;

// ===================== MQ2 =====================
int mq2Raw = 0;

// ===================== DHT11 =====================
float dhtTemp     = 0;
float dhtHumidity = 0;

// ===================== TIMING =====================
const uint32_t PRINT_INTERVAL_MS = 300;
const uint32_t DHT_INTERVAL_MS   = 2000;
unsigned long  lastPrint = 0;
unsigned long  lastDHT   = 0;

// ============================================================
//  BPM + SpO2 — instant single-beat calculation
// ============================================================
void processBPMSample(uint32_t irRaw, uint32_t redRaw) {
  unsigned long now = millis();

  dcValue = AC_ALPHA * dcValue + (1.0f - AC_ALPHA) * (float)irRaw;
  acValue = (float)irRaw - dcValue;

  redDC_val = AC_ALPHA * redDC_val + (1.0f - AC_ALPHA) * (float)redRaw;
  float redAC = (float)redRaw - redDC_val;

  if (prevAC < 0 && acValue >= 0) peakArmed = true;

  if (peakArmed && acValue > PEAK_THRESH) {
    unsigned long rr = now - lastPeakMs;
    if (lastPeakMs != 0 && rr >= MIN_RR_MS && rr <= MAX_RR_MS) {
      // ← instant BPM from single RR interval, no buffer needed
      stableBPM = constrain((int)(60000 / rr), 60, 160);
    }
    lastPeakMs = now;
    peakArmed  = false;
  }

  prevAC = acValue;

  // SpO2 window
  irAC_buf[spo2Idx]  = fabsf(acValue);
  redAC_buf[spo2Idx] = fabsf(redAC);
  irDC_buf[spo2Idx]  = dcValue;
  redDC_buf[spo2Idx] = redDC_val;
  spo2Idx = (spo2Idx + 1) % SPO2_WIN;

  if (spo2Idx == 0) {
    float irACrms = 0, redACrms = 0, irDCmean = 0, redDCmean = 0;
    for (int i = 0; i < SPO2_WIN; i++) {
      irACrms   += irAC_buf[i]  * irAC_buf[i];
      redACrms  += redAC_buf[i] * redAC_buf[i];
      irDCmean  += irDC_buf[i];
      redDCmean += redDC_buf[i];
    }
    irACrms   = sqrtf(irACrms  / SPO2_WIN);
    redACrms  = sqrtf(redACrms / SPO2_WIN);
    irDCmean  /= SPO2_WIN;
    redDCmean /= SPO2_WIN;
    if (irDCmean > 0 && redDCmean > 0 && irACrms > 0) {
      float R    = (redACrms / redDCmean) / (irACrms / irDCmean);
      stableSpO2 = constrain((int)(110.0f - 25.0f * R), 85, 100);
    }
  }
}

// ============================================================
//  MAX30102
// ============================================================
void updateMAX() {
  particleSensor.check();
  while (particleSensor.available()) {
    uint32_t ir  = particleSensor.getIR();
    uint32_t red = particleSensor.getRed();
    particleSensor.nextSample();
    lastIR   = ir;
    fingerOn = (ir > IR_FINGER_THRESH);
    if (fingerOn) {
      processBPMSample(ir, red);
    } else {
      dcValue = redDC_val = acValue = prevAC = 0;
      peakArmed = false; lastPeakMs = 0;
      stableBPM = 0; stableSpO2 = 0; spo2Idx = 0;
    }
  }
}

// ============================================================
//  MQ2
// ============================================================
void updateMQ2() {
  mq2Raw = analogRead(MQ2_PIN);
}

// ============================================================
//  DHT11
// ============================================================
void updateDHT() {
  if (millis() - lastDHT >= DHT_INTERVAL_MS) {
    float t = dht.readTemperature();
    float h = dht.readHumidity();
    if (!isnan(t) && !isnan(h)) {
      dhtTemp     = t;
      dhtHumidity = h;
    } else {
      Serial.println("DHT11 read failed");
    }
    lastDHT = millis();
  }
}

// ============================================================
//  Setup
// ============================================================
void setup() {
  Serial.begin(115200);

  Blynk.begin(BLYNK_AUTH_TOKEN, ssid, pass);
  Serial.println("Blynk connected");

  Wire.begin(21, 22);
  Wire.setClock(400000);  // ← I2C to 400kHz fast mode

  pinMode(MQ2_PIN, INPUT);
  dht.begin();

  if (!particleSensor.begin(Wire, I2C_SPEED_FAST)) {
    Serial.println("MAX30102 not found");
  } else {
    // 400 samples/sec ← was 100, 4x faster sampling
    particleSensor.setup(60, 4, 2, 400, 411, 4096);
    particleSensor.setPulseAmplitudeRed(0x3F);
    particleSensor.setPulseAmplitudeIR(0x3F);
    Serial.println("MAX30102 ready");
  }

  Serial.println("System ready\n");
}

// ============================================================
//  Loop
// ============================================================
void loop() {
  Blynk.run();
  updateMAX();
  updateMQ2();
  updateDHT();

  if (millis() - lastPrint >= PRINT_INTERVAL_MS) {
    Blynk.virtualWrite(V2, mq2Raw);
    Blynk.virtualWrite(V3, dhtTemp);
    Blynk.virtualWrite(V4, dhtHumidity);

    if (fingerOn && stableBPM > 0) {
      Blynk.virtualWrite(V0, stableBPM);
      Blynk.virtualWrite(V1, stableSpO2);
    } else {
      Blynk.virtualWrite(V0, 0);
      Blynk.virtualWrite(V1, 0);
    }

    Serial.printf("BPM: %d | SpO2: %d%% | IR: %u | Finger: %s | Gas: %d | Temp: %.1f°C | Hum: %.1f%%\n",
      stableBPM, stableSpO2, lastIR,
      fingerOn ? "YES" : "NO",
      mq2Raw, dhtTemp, dhtHumidity);

    lastPrint = millis();
  }
}
Raspberry Pi
import os
import time
import cv2
import base64
import requests
import numpy as np

# --- AI & Hardware Libraries ---
import tensorflow as tf
from gpiozero import DistanceSensor

# --- Thermal Camera Libraries ---
import board
import busio
import adafruit_mlx90640

# --- 1. CONFIGURATION ---
TRIGGER_PIN = 23
ECHO_PIN = 24
DISTANCE_THRESHOLD_M = 0.30  # Triggers when someone is within 30cm

MODEL_PATH = 'skin_classifier_multiclass.tflite'
CLASSES = ['Acne', 'dry', 'normal']

# Grab the API key from your terminal environment
OPENAI_API_KEY = os.getenv("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")
OPENAI_URL = "https://api.openai.com/v1/responses"

# --- 2. SETUP HARDWARE & AI ---
print("Initializing Ultrasonic sensor...")
sensor = DistanceSensor(echo=ECHO_PIN, trigger=TRIGGER_PIN, max_distance=4)

print("Initializing MLX90640 Thermal Camera...")
try:
    i2c = busio.I2C(board.SCL, board.SDA, frequency=400000)
    mlx = adafruit_mlx90640.MLX90640(i2c)
    mlx.refresh_rate = adafruit_mlx90640.RefreshRate.REFRESH_8_HZ
    thermal_frame = np.zeros((24*32,)) # Array to hold thermal data
    print("Thermal Camera Ready.")
except Exception as e:
    print(f"[-] Thermal Camera Error: {e}")
    print("Ensure I2C is enabled in raspi-config and wired correctly.")

print("Loading AI Model via TensorFlow...")
interpreter = tf.lite.Interpreter(model_path=MODEL_PATH)
interpreter.allocate_tensors()
input_details = interpreter.get_input_details()
output_details = interpreter.get_output_details()

height = input_details[0]['shape'][1]
width = input_details[0]['shape'][2]

def image_to_data_url(image_path):
    """Convert local image file to base64 data URL."""
    with open(image_path, "rb") as f:
        image_bytes = f.read()
    b64 = base64.b64encode(image_bytes).decode("utf-8")
    return f"data:image/jpeg;base64,{b64}"

def ask_chatgpt_for_skin_advice(image_path, predicted_class, predictions):
    """Send captured skin image + local AI result to OpenAI and get general advice."""
    if not OPENAI_API_KEY:
        return "No OpenAI key found. Did you run 'export OPENAI_API_KEY=...'?"

    try:
        image_data_url = image_to_data_url(image_path)
        acne_pct, dry_pct, normal_pct = predictions[0]*100, predictions[1]*100, predictions[2]*100

        prompt_text = f"""
You are helping with GENERAL skincare guidance only.
Do NOT provide a medical diagnosis.
My local AI classifier predicted: {predicted_class}
Confidence scores: Acne: {acne_pct:.1f}%, Dry: {dry_pct:.1f}%, Normal: {normal_pct:.1f}%

Please provide:
1. A short observation of visible skin appearance.
2. 3 simple tips to improve the skin.
3. A short skincare routine for morning and evening.
4. When the person should see a dermatologist.
Keep the answer practical and easy.
"""
        headers = {"Authorization": f"Bearer {OPENAI_API_KEY}", "Content-Type": "application/json"}
        payload = {
            "model": "gpt-4.1-mini",
            "input": [{"role": "user", "content": [{"type": "input_text", "text": prompt_text}, {"type": "input_image", "image_url": image_data_url}]}]
        }

        response = requests.post(OPENAI_URL, headers=headers, json=payload, timeout=60)
        data = response.json()

        advice_text = ""
        if "output" in data:
            for item in data["output"]:
                if item.get("type") == "message":
                    for content_item in item.get("content", []):
                        if content_item.get("type") == "output_text":
                            advice_text += content_item.get("text", "")

        return advice_text.strip() if advice_text.strip() else "No advice text returned."
    except Exception as e:
        return f"Error: {e}"

def capture_and_classify():
    print("\n[+] Person in range! Opening both cameras for 10 seconds...")
    cap = cv2.VideoCapture(0)

    if not cap.isOpened():
        print("[-] Error: Could not open normal webcam.")
        return

    start_time = time.time()
    # 10-second live preview loop
    while time.time() - start_time < 10.0:
        ret, frame = cap.read()

        # 1. Get Thermal Frame (wrapped in try/except because I2C can occasionally drop a frame)
        try:
            mlx.getFrame(thermal_frame)
        except ValueError:
            pass # If it drops a frame, just use the previous one

        if ret:
            # Resize standard webcam to 640x480 for consistency
            frame = cv2.resize(frame, (640, 480))

            # 2. Process Thermal Data into an image
            t_min, t_max = np.min(thermal_frame), np.max(thermal_frame)
            if t_max > t_min: # Prevent divide by zero error
                thermal_img = (thermal_frame - t_min) / (t_max - t_min) * 255.0
            else:
                thermal_img = thermal_frame

            thermal_img = np.uint8(thermal_img)
            thermal_img = np.reshape(thermal_img, (24, 32)) # Native MLX90640 resolution

            # Apply heat map colors and scale up to match webcam (640x480)
            thermal_colormap = cv2.applyColorMap(thermal_img, cv2.COLORMAP_JET)
            thermal_colormap = cv2.resize(thermal_colormap, (640, 480), interpolation=cv2.INTER_CUBIC)

            # --- Overlay Max Temperature on Thermal Feed ---
            cv2.putText(
                thermal_colormap, f"Max Temp: {t_max:.1f} C", (20, 50),
                cv2.FONT_HERSHEY_SIMPLEX, 1, (255, 255, 255), 3, cv2.LINE_AA
            )

            # --- Overlay Countdown on Standard Feed ---
            time_left = int(11.0 - (time.time() - start_time))
            cv2.putText(
                frame, f"Capturing in {time_left}...", (20, 50),
                cv2.FONT_HERSHEY_SIMPLEX, 1, (0, 165, 255), 3, cv2.LINE_AA
            )

            # Combine images side-by-side (Horizontal Stack)
            combined_view = np.hstack((frame, thermal_colormap))

            # Show the dual-feed
            cv2.imshow("Skin Classifier: Normal + Thermal", combined_view)
            cv2.waitKey(1)

    # Final capture when 10 seconds are up
    ret, frame = cap.read()
    cap.release()
    cv2.destroyAllWindows()

    if not ret:
        print("[-] Error: Failed to capture final image.")
        return

    print("[+] Image captured. Analyzing standard photo...")

    # Preprocess for TFLite model
    img = cv2.resize(frame, (width, height))
    img = cv2.cvtColor(img, cv2.COLOR_BGR2RGB)
    img = img.astype(np.float32)
    img = np.expand_dims(img, axis=0)

    interpreter.set_tensor(input_details[0]['index'], img)
    interpreter.invoke()
    predictions = interpreter.get_tensor(output_details[0]['index'])[0]
    best_match_index = np.argmax(predictions)
    predicted_class = CLASSES[best_match_index].upper()

    print(f"\n-> WINNER: {predicted_class}")
    cv2.imwrite("last_capture_normal.jpg", frame)

    print("[+] Sending image to OpenAI for advice...")
    advice = ask_chatgpt_for_skin_advice("last_capture_normal.jpg", predicted_class, predictions)

    print("\n========== CHATGPT SKIN ADVICE ==========")
    print(advice)
    print("=========================================\n")

def main():
    print("System Ready. Waiting for face within 30cm of the sensor...")
    last_trigger_time = 0
    cooldown = 5  # Seconds to wait before allowing another trigger

    try:
        while True:
            # Check distance sensor
            if sensor.distance < DISTANCE_THRESHOLD_M:
                current_time = time.time()
                if current_time - last_trigger_time > cooldown:
                    capture_and_classify()
                    last_trigger_time = time.time() # Reset timer after full process finishes
                    print("Ready again. Waiting for next person...")
            time.sleep(0.1)

    except KeyboardInterrupt:
        print("\nProgram stopped by user.")
        cv2.destroyAllWindows()

if __name__ == "__main__":
    main()
Results
The results are shown below:
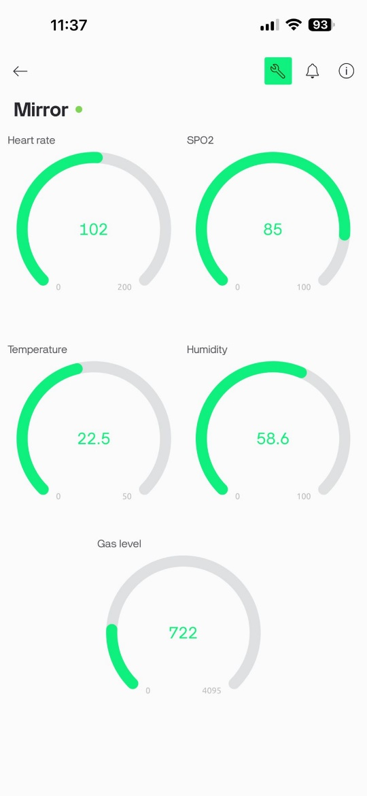
Blynk Dashboard
AI Skin Model Analysis
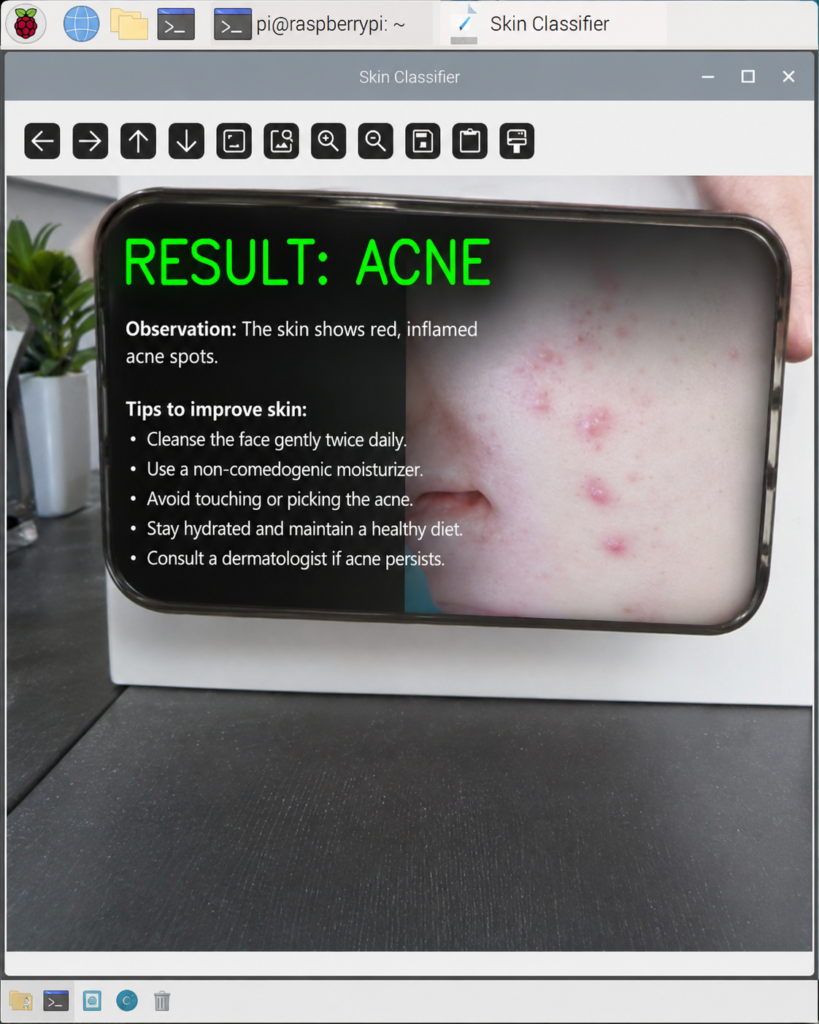
Acne Detection
The AI model classified the captured skin image as acne and displayed the result on the Raspberry Pi interface. The system also provided basic skincare suggestions while avoiding a formal medical diagnosis.
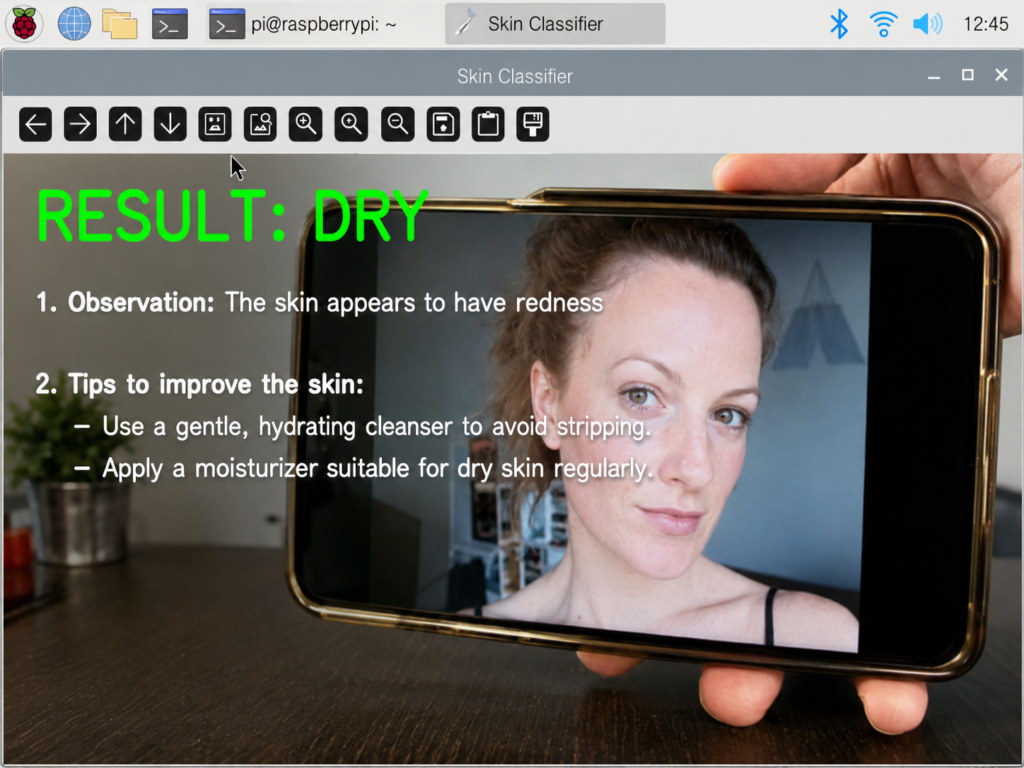
Dry Skin Detection
The AI model classified the captured facial image as dry skin and presented the result in real time.
The interface provided simple guidance, including the use of a hydrating cleanser and suitable moisturizer.
Frequently Asked Questions
- What is the smart mirror that is based on AI?
An AI-based smart mirror is an interactive system composed of a mirror, a display, sensors, cameras and AI. It can display environmental data, process images and offer valuable information to the user, while he stands in front of it.
- What type of controllers are employed in this smart mirror project?
The project is based on ESP32 microcontroller and Raspberry Pi. The ESP32 is powering the health and environment sensor reading, and the Raspberry Pi is handling camera input, thermal imaging and skin classification with AI.
- What sensors are used in smart mirror?
The system uses a MAX30102 pulse sensor, DHT11 temperature and humidity sensor, MQ-2 gas sensor, ultrasonic distance sensor and MLX90640 thermal camera. Facial images are also taken using a USB camera for skin analysis.
- How does the skin classification system work?
The image taken by the USB camera is passed to a TensorFlow Lite model that is hosted on the Raspberry Pi. The model takes the photo as input and outputs whether the skin in the picture is suffering from acne, dry or normal.
- Is it possible for this smart mirror to diagnose skin diseases?
No. The smart mirror is an educational engineering prototype, rather than a certified medical device. The information it provides should only be considered general information and should not be used as a substitute for medical advice from a dermatologist.
- What kind of display does the sensor display the readings on?
The ESP32 transmits heart-rate, estimated SpO₂, temperature, humidity and MQ-2 value via Wi-Fi to the Blynk platform. The values can then be viewed on a mobile or web dashboard.
- Can the AI smart mirror work without an internet connection?
The local TensorFlow Lite skin-classification model does not require Internet access. The Blynk app, however, does need internet access for updates and for receiving online recommendations from AI.
- What does the thermal camera do?
The MLX90640 thermal camera senses temperature variations and generates a heat map. It may indicate the warmest spot in the camera’s view, but it shouldn’t be used to diagnose inflammation or medical conditions.
- Does this project fit the requirements of AUM engineering students in Kuwait?
Yes. This project fits well for AUM students and other engineering students as it incorporates all the technologies of embedded systems, IoT, Python, image processing, AI, sensor interfacing and development of cloud-dashboard in one single project.
- How can I get the complete documentation, project guidance and source code?
For complete project documentation, implementation guidance, circuit details and source code assistance, you can contact our team through the Contact page. Please include your project requirements so we can provide the most relevant support.
